What is a work schedule?
A timeline is a logical list of project tasks, representing the tasks and people responsible for each, in stages and completion dates. This allows project managers to view the entire project in one place.
This is usually in the form of a graph based on dates, arranged in horizontal bars, indicating the task and its duration. Each bar can represent a day, month, or year. Each task represented is assigned a name and a corresponding start and end date.
This way, the project schedule provides a detailed overview of the entire project from start to finish. You can see when a task starts and when it’s due. You can also see whether a task is dependent on others.
Work schedules are also known as timelines, project timelines, Gantt charts, among others.
Find freelance work projects and apply now
What do I need to make a schedule?
This can be created within a simple spreadsheet, such as Excel or Google Docs. On the left side, you can place the list of tasks and then the periods corresponding to each one.
You can assign each manager by color or by placing their name next to each task, as you’ll see in the steps below.
Currently, there are also some software programs that can help you accomplish this task easily. For example, Project, Microsoft’s traditional project management tool, or Instagantt, a fairly easy-to-use online tool.
Not all projects need a work schedule drawn up in the form of
Among the advantages of creating a detailed timeline. Obviously, when the project is small or if you are the only delegate, you can manage it with a simple task list. However, for projects that take several days or weeks, involve more parties, or for multidisciplinary teams, it’s better to create a timeline so everyone is clearer about their responsibilities.
Benefits of a Gantt chart or schedule:
- Organize tasks
- Assign members or areas in charge (one or more)
- Define the stages of your project in milestones or deliverables
- Show when each task in the project starts
- See delivery deadlines for each one
- Place dependent tasks
- See how the work done by each member impacts the entire project
How to create a schedule correctly?
To make a good schedule for your project, follow the steps below:
Define the scope and objectives of the project
The first step is to outline the project’s scope, objectives, and milestones. These milestones can be defined through progress reviews or task deliverables.
This is an essential part of the project management plan.
The scope contains a summary of what is needed for the schedule and work plan:
- What do you want to achieve?
- How it will work
- Who is it for?
- Scope and limitations of the project
- Final product or solution
Make your to-do list
Once you’ve defined your scope or objectives, you can begin creating a list of tasks to be completed, outlining the extent of each task. You can also write down the deliverables that will be presented as project progress.
Identify the dependencies of each task: Once you’ve identified all the tasks required for the project, figure out which of those activities depend on other tasks to start or finish.
If one task depends on another, write it down below in list form (you can use bullet points to differentiate).
Assign each task a duration
You do this by estimating a reasonable timeframe for the task to be completed. This is a key step for your schedule. You must carefully consider the required delivery time, taking into account the potential for setbacks. It’s better to allow time for error correction and work calmly than to rush and work on deadlines. Always leave a couple of days’ margin for each task to be completed.
Establish milestones and deliverables
Establish, either with the help of your team of partners or with your client, the project’s milestones or stages. These are important dates that mark the end of each phase and the beginning of the next.
Each milestone is achieved by completing sequences of tasks and deliverables within each stage.
Once you’ve defined all of the above, you can convert it to a schedule format. But you must make sure nothing is left out and, if necessary, that your client agrees to the deliverables.
In any case, remember that the work schedule can be presented to the client and modified at their request, so the first version you create may not be the final one.
Prepare the schedule
Ideally, you should work with it in table form or in a format that includes a grid. This is why a spreadsheet is ideal. However, existing software allows you to do this easily as well.
The advantage of the latter is that they allow you to make changes more quickly, but any spreadsheet will be just as useful.
The first thing you need to understand is that you’ll need to leave a couple of lines to write down dates, and the left column is for writing down tasks and assignees.
On the top two lines, write down the months and dates of progress, whether by days or weeks:
Then, color-coded the boxes that represent the days or weeks your project will take. Make sure they are arranged from the first to be completed to the last: 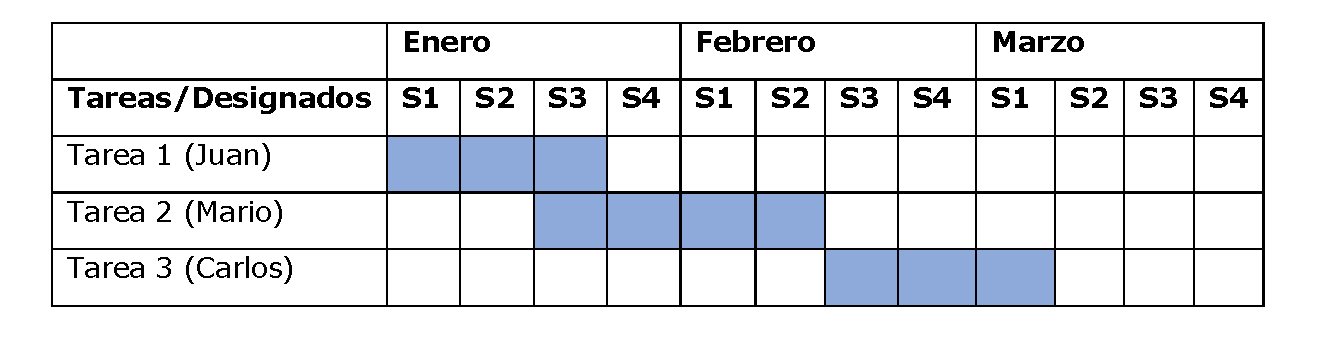
If you need to mark milestones or dependent tasks and you’re working in a spreadsheet, you can add a line between tasks to mark the dependencies or stages: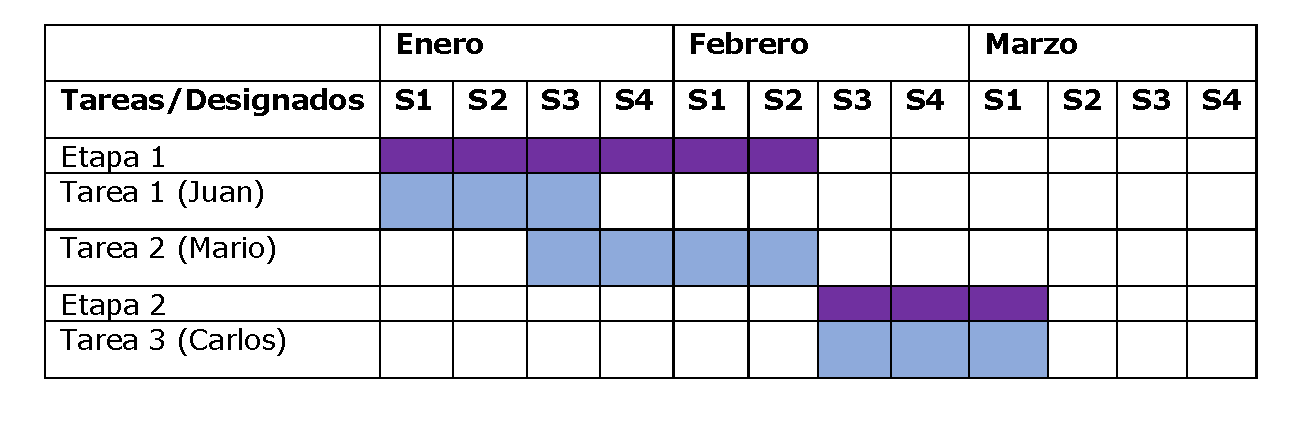
In this case, the timeline allows you to see that, for example, the first two tasks are part of stage 1 while the third corresponds to the second or final stage.
Continue adding tasks and assignees to each one, being careful to check the boxes for the correct dates.
Once you’ve finished it, you can save it as is or export it to PDF for better presentation and to prevent it from being modified by others (Don’t forget to save the original in case changes are needed). It’s also a good idea to review it carefully, and if possible, have someone help you review it before attaching it to your bid.
Ready!
Once you’ve done the above, your schedule can be presented to your client. If they also approve the schedule as you’ve established it, you’ll have saved time in the stage of organizing your team or tasks and will have a clearer idea of where to start.
In Conclusion
As you can see, creating a work schedule is very useful when carrying out projects that involve several stages or where you’ll need the collaboration of allies or colleagues to deliver excellent work to the client.
While it takes a little time to develop a good schedule, it’s not overly complicated and is well worth the effort to gain clarity about the work to be done.
Ideally, the bids you submit for this type of project should include a timeline.
Remember that with your Elite account On SoyFreelancer, you can attach files to your bids for each project you apply for. Take advantage of this benefit and start adding timelines to your larger projects. It’s a detail your clients will appreciate and will make you look much more professional.
Find freelance projects and apply in the Freelance Jobs section .